
こんにちは。イノベーション本部の野村です。
今回は以前の記事も参考にしながら、FlutterでMLKitを試してみました。
Flutterとは
FlutterはGoogleが提供しているOSSのアプリケーションフレームワークで、
クロスプラットフォームに対応しているため、Android、iOS、Web、Windows、Mac、Linux等に
対応したアプリを開発することができます。開発言語はDartという言語を使います。
MLKitとは
ML Kitはトレーニング済みのモデルを使って、より簡単に機械学習をモバイルアプリに組み込めるよう
Googleから提供されているパッケージで、オンデバイスとクラウドベースのAPIがあります。
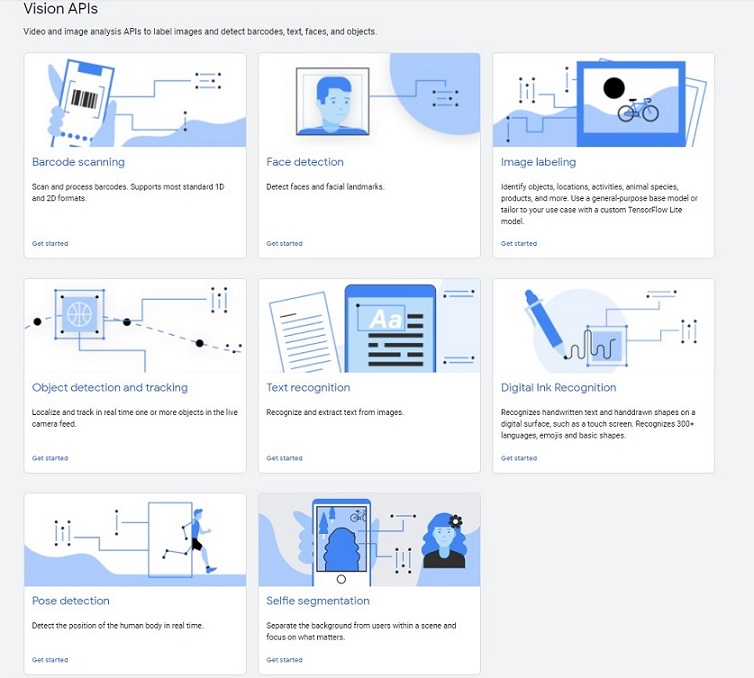
オンデバイスでは大きくVsionAPIと自然言語APIがあり、それぞれ以下のような機能が提供されています。
- VisionAPI
- バーコードスキャン、顔検出、画像のラベリング、物体検出、テキスト認識、手書き認識、
姿勢検出、セルフィーセグメンテーション
- バーコードスキャン、顔検出、画像のラベリング、物体検出、テキスト認識、手書き認識、
- 自然言語API
- 言語認識、翻訳、スマートリプライ、エンティティ抽出

今回は以前の記事を参考に、オンデバイスの顔検出APIを利用したAndroidアプリをFlutterで作ってみます。
環境
- Android Studio 4.2.1
- minsdk:21
- targetsdk:29
- Flutter 2.5.3
- Camera Plugin 0.9.4
- MLKit Flutter Plugin 0.7.3
- Windows 10
- Google Pixel 3a
(Flutterのインストールやセットアップ手順はこちらを参照)
カメラアプリの作成
Flutterではpub.devというDartの公式パッケージリポジトリに様々なPluginが提供されていて、
NativeのAPIやよく使う機能をパッケージ化して便利に利用することができるようになっています。
今回、カメラアプリについてはcamera pluginのサンプルを使います。
(Complete exampleのコードをそのまま使います)
MLKitの組み込み
MLKit on Deviceについてもpub.devで提供されているPluginを利用して、リファレンスを参考に
↑のカメラアプリにMLKitの顔検出モジュールを組み込んでいきたいと思います。
-
pubspec.yamlにMLKit Pluginの依存関係を追加
dependencies: google_ml_kit: camera: path_provider: path: -
下記コマンドでパッケージをインストールします
$ flutter pub get -
Manifestに以下を追加
<meta-data
  android:name="com.google.mlkit.vision.DEPENDENCIES"
  android:value="face" />
ここからはmain.dartに記述していきます。
- インストールしたMLKitパッケージをインポート
import 'package:google_ml_kit/google_ml_kit.dart';
-
camera pluginで撮影したイメージからInputImageを作成します
final image = await _controller.takePicture(); final inputimage = await InputImage.fromFilePath(image.path); -
TakePictureScreenStateクラスの中で、faceDetectorインスタンスを作成します
class TakePictureScreenState extends State<TakePictureScreen> { late CameraController _controller; late Future<void> _initializeControllerFuture; FaceDetector faceDetector = GoogleMlKit.vision.faceDetector(FaceDetectorOptions( enableClassification: true, enableLandmarks: true, enableTracking: true)); -
detectFaceというメソッドを用意して、顔検出したら「鼻の位置」と「笑顔度」と「トラッキングID」を
ログに出力するようにしておきますFuture detectFace(InputImage inputImage) async { final faces = await faceDetector.processImage(inputImage); print('Found ${faces.length} faces'); if (faces.length != 0) { for (Face face in faces) { // If landmark detection was enabled with FaceDetectorOptions (mouth, ears, // eyes, cheeks, and nose available): final FaceLandmark? nose = face.getLandmark(FaceLandmarkType.noseBase); if (nose != null) { final Offset nosePos = nose.position; print("Nose Position : $nosePos"); } // If classification was enabled with FaceDetectorOptions: if (face.smilingProbability != null) { final double? smileProb = face.smilingProbability; print("Smile Prob : $smileProb"); } // If face tracking was enabled with FaceDetectorOptions: if (face.trackingId != null) { final int? id = face.trackingId; print("Id : $id"); } } } } -
フローティングアクションボタンが押されたら↑のdetectFaceメソッドを呼び出すようにします
floatingActionButton: FloatingActionButton( // Provide an onPressed callback. onPressed: () async { // 省略 await detectFace(inputimage); -
最後にdispose()でリソースを解放します
@override void dispose() { // Dispose of the controller when the widget is disposed. _controller.dispose(); faceDetector.close(); super.dispose(); } -
これで、人の顔を撮影するとログに顔検出した結果が出力されるようになりました。
もう少し改良
ログが出力されるようにはなりましたが、もう少し改良して人の顔を撮影すると撮った写真の上に「笑顔度」が
表示されるようにしてみたいと思います。
-
まず、detectFaceメソッドは笑顔度を返すように変更します
Future<String> detectFace(InputImage inputImage) async { final faces = await faceDetector.processImage(inputImage); String resText = "No Face"; print('Found ${faces.length} faces'); // 省略 // If classification was enabled with FaceDetectorOptions: if (face.smilingProbability != null) { final double? smileProb = face.smilingProbability; print("Smile Prob : $smileProb"); //笑顔度を返す int intsmileProb = (smileProb! * 100).round(); resText = "SMILE $intsmileProb %"; } // 省略 } return resText; } -
写真を撮った後の画面(DisplayPictureScreen)はStackウィジェットを使って笑顔度を
重ねて表示するようにしておきます// A widget that displays the picture taken by the user. class DisplayPictureScreen extends StatelessWidget { final String imagePath; final String smileText; const DisplayPictureScreen( {Key? key, required this.imagePath, required this.smileText}) : super(key: key); @override Widget build(BuildContext context) { return Scaffold( appBar: AppBar(title: const Text('Display the Picture'), backgroundColor: Colors.blue ), // The image is stored as a file on the device. Use the `Image.file` // constructor with the given path to display the image. body: Stack(children: [ Image.file(File(imagePath)), Center( child: Container( alignment: Alignment.bottomCenter, margin: EdgeInsets.all(30.0), child: Text( smileText, style: TextStyle( fontWeight: FontWeight.bold, fontSize: 50.0, color: Colors.deepOrangeAccent), ), ), ) ], fit: StackFit.expand), ); } } -
フローティングアクションボタンが押されたらdetectFaceメソッドを呼び出し、
DisplayPictureScreenに笑顔度を渡しますfloatingActionButton: FloatingActionButton( // Provide an onPressed callback. onPressed: () async { // 省略 // 笑顔度を受け取ってセットする var result = ""; await detectFace(inputimage).then((String value) { result = value; print("value : $value"); }); // If the picture was taken, display it on a new screen. await Navigator.of(context).push( MaterialPageRoute( builder: (context) => DisplayPictureScreen( // Pass the automatically generated path to // the DisplayPictureScreen widget. imagePath: image.path, smileText: result, ), ), ); // 省略
以上で完成です!

さいごに
今回はFlutterでMLKit on Deviceを使ったアプリを作ってみました。
デバイスサイドで動くエッジAIのニーズはこれからも高まってくると思うので
引き続き追いかけていきたいと思います。
最後までお読みいただき、ありがとうございました。